Rechercher dans ce blog

mercredi 31 octobre 2012

Promo Gopro 2 HD motorsports 279€

Bonjour

Pendant une période limitée, la Gopro HD2 motorsports avec son cable AV/FPV à un prix fou 279€ TTC

Très peu de pieces ....


279€ TTC Garantie 12mois 

lundi 29 octobre 2012

GH2 on Zenmuse Get Better performance


Voici les infos pour récupérer le nouveau Firmware pour votre caméra Panasonic Lumix GH2 .


Firmware Camera : 


here I provide you the special firmware:
and thats are the key features:
-Higher Bit-rate for Video creates film like image detail & motion quality.
-Ability to allocate data towards Video Motion or still detail quality.
-Higher Bit-rate for Audio, Boost audio quality from 192,000bps to 440,000bps
-Pal & 25p framrate
-Unlocked ISO up to 12,800k enables you to shoot in extreme dark conditions or overcome a slow lens


Réglages Caméra :


To get the best image quality possible out of the Panasonic GH2 you are going to want shoot in a 1920×1080 resolution, 24 frames a second, the AVCHD codec and the Smooth color curve. This is of course assuming you want to get the most latitude and dynamic range or the flattest image possible. For the best latitude you will want to stick to the SMOOTH color profile with all of the options set to -2. The smooth profile uses a curve that handles highlights with a smooth roll off. With the saturation dialed back, muted colors will lend well in post when you are trying to create your look and color grade the footage. A Flat image with the least contrast possible is what you want to take into post production. Anything too saturated or with too much contrast will create problems since you will be STUCK with that look and it will severely limit the color grading options and creativity when you get to post.
-Set the dial on top of the camera to the setting that shows the letter M proceeded by the image of a traditional film camera “Creative Movie Mode”.
-Now go into the menu by pushing the Menu/Set button next to the LCD screen
-The first menu in Creative Movie Mode : has 3 film settings. Select the middle option “24p CINEMA”

Now go down to the second set of options or the “Motion Picture” screen.
- Set Film mode to Smooth with all the options set to -2 and hit Memory to save it.
- Set REC QUALITY to 24H
- Set EXPOSURE MODE to M, This will allow you to take control of your aperture and shutter during recording.

Optional but highly recommended: Go down to the third menu screen that looks like a C and a wrench. Set Histogram to on. The histogram is crucial! When you cant trust your eye or the LCD screen a histogram will accurately tell you if your clipping your highlights or if you are under exposed, it’s a great tool you shouldn’t pass up on.
Other Options
CONTINUOUS AF
With compatible lenses this will determine whether or not it will auto-focus continually during recording in an attempt to keep the subject in focus at all times. Not generally recommended for a film but can be useful at times in casual situations.
Note: If this is set to on you can still manually focus by half pressing on the rec button and turning the focus ring.
Off: You have to focus by turning the focus ring on your own

I.DYNAMIC
Generally i love this setting and tend to keep it on. It boosts the exposure in darker areas exclusively. When would you NOT want more dynamic range? The default setting is OFF

Metering Mode
Try them, i use the second one the most but metering mode really depends on your style of lighting and preference. They can each useful in the right lighting.

WINDCUT
When this is set to ON the camera will try to cut out wind-noise on the internal mics, nothing you cant do in post. I recommend leaving this set to off.

MIC LEVEL DISP
Set this to to ON unless you don’t want your mic levels on screen Even in that situation it’s good to have it ON so you at least know your cameras mic is not broken and that you’ll be able to sync your sound without a visual clap. Also, to impress your Canon friends whose cameras don’t do that.

MIC LEVEL ADJ
Determines microphone sensitivity. Generally 2 suits most situations just fine and if anything i go down to 1 in louder situations.
page1image31480
page1image31752
page1image32024
page1image32296
page1image32568
page1image32840
page1image33112
page1image33384
page1image33656
page1image33928
EX. TELE CONV
This is a nifty feature that doubles your focal length. It scans the center of the sensor recording 1080p in about 4x “zoom” compared to off. IT IS NOT A ZOOM feature, It doesn’t degrade the image. This can be very useful with lenses not designed to cover the sensor. For example an old c-mount lens from your old Bolex camera. You can adapt it to the GH2 and if you get sever vignetting... problem solved.

REC HIGHLIGHT
Remember Zebras? Its the same thing! If any part of your image is severely over exposed to the point that there is nothing but white, no detail there. It is going to blink and flicker in a solid black covering the over exposed area. I keep this off and instead rely on the histogram. You could do a combination of the two but its far from necessary since the histogram already gives you all the information you need. 

vendredi 26 octobre 2012

ASTUCES REMZIBI gps et altitude


                                                            EN COURS

Bonjour

Voici la réponse de Remzibi .


About position , all depends of what mps are you using with what offset .
If it is google maps so the offset of GPS (GPS Datum) must be set to 220=WGS 1984 Global Definition 

Then when we typing position in google - must be typed propertly 

About the altitude , it is only GPS ability , OSD simply typ the value delivered by GPS .
Altitude is not a function of GPS it is implemented "by the way" .
Some more information about altitude errors is here https://sites.google.com/site/remzibiosd/2-remzibiosd/4-gps-module


jeudi 25 octobre 2012

Montage Du Baro DH-101 AQ50


BROUILLON EN COURS


Bonjour


Aujourd'hui test d'une AQ50 avec MPU sur un F330 équipé DJI OPTO 18A et moteur d'origine , hélices 8x4 Dji et accus 2100mah 3S .

La carte dispo en ce moment est livrée en version 6.1 

On installe le driver du dongle dispo ICI
ATTENTION: LE PORT COM DOIT ETRE COMPRIS ENTRE 1 ET 9.

LES SOFTS DOIVENT ETRE DEMARRES EN TANT QU'ADMINISTRATEUR ( CLICK DROIT) .

Impérativement descendre les gains sur la carte de manière significative ( sens horaire pour augmenter ... oui ....oui ) .
Et j'affine le Gain dans le soft à 7.2 , la machine est saine; si, à grand coup de gaz la machine oscille rapidement, baisser le gain sur la carte ( sens horaire) .

Installation du Baro DH-101 , déja, eh bien ,on peut retirer facilement le Buzzer .
On n'oublie pas de passer le 4ème dipswitch en position haute .

Idem on met le firmware adéquat dans la carte: pour une carte avec DS-sensor, il faut TMF_AQ50D_V6.4_for_add_on.tmf de chargé dans la carte .
Si par contre la carte utilisée est une carte a base de MPU dans ce cas uploadez le firmware TMF_AQ50D_6.0_for_embedded.tmf .


BROUILLON EN COURS

mardi 23 octobre 2012

10/11/2012 Nouveau stock de DExmodel

Bonjour

Apres un long moment sans stock de chassis Dexmodels ....
Oui Denis avais en projet de faire un Dex8 ... cela lui a pris beaucoup de temps et d'argent .


DeX Pro8 from DeX on Vimeo.


Pour vous faire patitenter, la dernière vidéo de Denis , ou il veut casser sa machine ?? ;)


DeX Mini Quad Crash Test from DeX on Vimeo.

lundi 22 octobre 2012

Rappel Antenne GPS Dji


Bonjour

La nouvelle tombe Vendredi 19 Octobre dans l'après Midi . Procédure de rappel des nouvelles antennes GPS sur les grosses Machines XL , type S800 , Cinestar , Hexa XL etc .... pour les systèmes Dji Wookong-M . ( EDIT SUR TOUTES LES MACHINES )
La mise à jour ne peut pas se faire par l'utilisateur ou le revendeur: renvoi obligatoire chez DJI .
Pour le moment, nous n'avons pas les contre-parties pour faire un échange ( prévu ce Jeudi ) .


Fpv4ever


DJI FINDS FIRMWARE BUG CAUSING SPONTAN E OUS S800 SYSTEM FAILURE

Research and testing confirms zero faults with S800 air frame –  error found in compass firmware

DJI, one of the  world’s leading developers and manufacturers in UAV systems, today announced a
voluntary recall of all WooKong- M GP S compasses purchased after  June  15th ,  2012.  The new
compasses’ firmware contained a bug that, under very specific conditions, could  send  an  erratic signal
causing a spike in power and overall system failure.    DJI confirmed both the fault and the bug  fi x by flying
four S800s under heavy burden on electric tether for more than 72 hours without failure.

Since learning of the system failures during several S800 flights, DJI spent more than 1 600   man hours in
research and testing to  determine the fault and develop a solution for customers.  Through the vigorous
research   process, DJI engineers not only fixed  the bug in the firmware, but  also   developed multiple new
innovations for the WooKong - M GPS compass.

At this point in time DJI would advise that  users of large  multi-rotors  (S800 size and large r) fitted with
post - June 15
th
  compasses  should not fly their multi rotors until  their GPS/Compass   has been returned for
firmware upgrade .

All customers with WooKong- M GPS compasses purchased after June  15th , 20 12 should contact their
dealer   or click   http://www.dji- innovations.com/compass/submit_rma/   to   get  information on returning
their GPS/Compass  module for firmware upgrade.

In turn, DJI is also developing a new firmware upgrade for the WooKong - M IMU based on the innovations
developed for the compass bug fix.  The IMU firmware upgrade will be released within the next several
weeks and will have superior solutions for the following: better resistance to vibration , less white l ights
and better compass tracking.  A further announcement will be made   when this firmware enhancement will
be available.

We are excited that we not only discovered the fault and developed a fix, but also created a superior
firmware in the process.  We look forward to working with all our customers to quickly replace their
a ffected compasses and get everyone back in the air .


Old GPS Module (OKAY TO FLY):

New GPS Module  (NEEDS NEW FACTORY FIRMWARE) :

For any questions or concerns about the potential system failure caused by the compass firmware bug,
customers and dealers can email  support@dji- innovations.com for immediate support.

DJI Innovations Technology Co. Ltd.
OCT 19th, 2012

dimanche 14 octobre 2012

AQ50 TMF et Options Baro DISPO + News

Bonjour

Les AQ50 équipés de MPU seront en stock avant fin octobre . DISPO ICI

Les options Baro seront aussi dispo . Cette option fonctionne avec toutes les cartes qui ont un MPU ( même les violettes + DS sensor) . DISPO CHEZ FPV4EVER  ICI


TMF travaille sur une nouvelle nacelle pour Gopro et une carte de stabilisation Nacelle 3 axes .


http://www.youtube.com/watch?v=V9CrfQu5Yxw
http://www.youtube.com/watch?v=IbB23XZXXw8&feature=plcp


Fpv4ever

jeudi 11 octobre 2012

Gamme WLtoys Mini Quadri V929 , V939 , Hélico V911 .... er9x Th9x

Bonjour


De plus en plus de quadri sont décliné en pseudo jouet high tech , on trouve une multitude de mini , micro Quadricoptère , multirotor de disponible sur le marché .
Il y a bien le MQx et le Ladybird mais cher .

Une marque se démarque un peu du lot en faisant des petits Quadri low cost mais qui procure un réel plaisir . Du fait de leur petite taille , ils craignent peu la casse et sont parfait pour se defouler ou s'entrainer .
Toute la gamme est livré avec 2 batteries et chargeur .Compatible radio turnigy TH9X

Le V939 (11cm) livré complet avec 2 batteries et chargeur USB a 59€ ICI

il est tout petit , équipé de LED en bout de bras de serie .
Le V929 (19cm) livré complet avec 2 batteries et chargeur secteur a 69€ ICI


Le V911 ( 24cm de long)  Livré complet avec 2 batteries et chargeur USB .... des le 12 octobre 2012

Trés solide et résiste un peu au vent


Les radios du V939 et V929 sont identiques et on peut les intervertir .On peut même piloter l' hélicoptere à pas fixe le V911 .
Le V911 lui est un frêre jumeau des solo210 , fp100 etc...
La différence de radio entre le V911 (héli) et celle des quads c'est le bouton à 4 modes de vol pour les quad et à 2 modes de vol pour l'héli .

Cette gamme est aussi compatible avec les radios Turnigy TH9X, et Eurgle, Flysky  AVEC ou SANS firmware ER9X .Mettre l'ordre des voies AETR .

Alors comment bien utiliser ces machines ? 

1/ Charger la batterie , il est préférable d'utiliser un chargeur dédié style imax B6 etc ..

2/ Attendre 30min minimum avant de recharger la batterie après utilisation .

3/ Insérer la batterie dans le logement dédié; bien la mettre au milieu pour respecter le centre de gravité .

4/ BINDER l'émetteur (radio) avec la machine: pas nécessaire fait en USINE.
Mais au cas ou, pour les plus malchanceux ou ceux qui utilisent une radio pour plusieurs modèles:
- Allumer le quadri, attendre le clignotement lent de la led  pour le V929 et la deuxième série de clignotements rapides sur le V939.
 -Allumer à ce moment là la radio, en appuyant sur le bouton MODE en haut à gauche; puis le relâcher au bout de 3à4 secondes .
5/ mise en route normale: Allumer le quadri, puis la radio; pour le V939, attendre le clignotement rapide de la led rouge avant d'allumer la radio .

6/ MODE de vol 

Le V929 :

  mode 20%  Quadri très très mou . 
  mode 40%  Bien pour débuter .
  mode 60% Mode normal + le meilleur
  mode 100% ACRO pour effectuer une figure, mettez le manche du Avant/Arriere ou Droite/Gauche à fond et relachez aussitot le manche .

Le V939 :

    mode 20% Idéal enfant beaucoup trop d'expo
    mode 40% utlisable intérieur / extérieur 
    mode 60% Se comporte comme un quadri sans accélérometre
    mode 100%  Idem V929


mardi 2 octobre 2012

Pour câbler le HDMI AV

Bonjour,

Ce boîtier sert à convertir un signal HD en signal analogique .
Donc cela prend le signal de la sortie HDMI d'un APN style Nex 5 , GH1/2 ou caméra pour l'envoyer dans un émetteur vidéo .
Et donc avoir un retour vidéo au sol de son boîtier .

Nécessaire :

Fer à souder.
Colle chaude.
Cutter.
Rallonge servo ou prise mâle .
Gaine Thermo-rétractable diamètre 2.00mm.
Tresse à dessouder.

Un HDMI AV disponible ICI


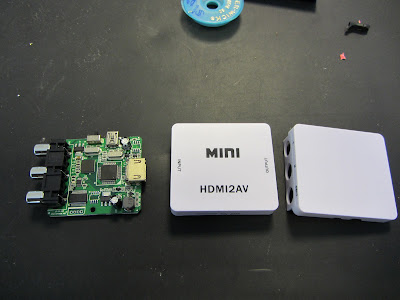
Ouvrir le boitier à l'aide d'un cutter

Voici la "bête" démontée

Coupez les connecteurs pour pouvoir les dessouder 


Couper le cable USB fourni


Seuls la Masse (le - Noir et le +5Vdc Rouge)  nous intéressent

Le signal vidéo se situe sur la prise supérieure .
La masse à gauche, le Signal vidéo Jaune à droite .

Voici le montage prêt à l'emploi ,
On utilise un BEC 5V pour alimenter le convertisseur, via le port USB .

On pense à sécuriser les soudures avec de la colle chaude .